If you have ever regretted that Android game or application that you like so much does not have a native Windows client, you should know that there are several free applications with which you can use Android apps on your PC. These are tools that virtualize the entire Google operating system on your computer.
It may sound complicated, but really they are very simple applications to install and use. Even so, today we will explain step by step how to use Android applications on your PC by installing one of these programs, downloading them in any app and executing them.
As we said at the beginning there are several programs with which you can do all this, and today continue to launch new alternatives to compete in the sector. From my own experience, the emulator that has always worked best for me is BlueStacks, and for that reason, it will be the one chosen for this little tutorial.
However, there are almost equally competent alternatives that have a growing legion of followers, such as MEmu, NOX (specialized in games) or even the newborn Remix OS Player. The interface and the operation of all are usually very similar, so if there is a specific application that does not work for you, it does not stop to try any of these others.
Installing BlueStacks:
The first step you have to give is to install the program itself. For that, go to the BlueStacks website and, at the top right, you will see the Download button. Press it to automatically start the download of the executable file to install it, and once it is downloaded, start it like any other program.
You will go to a first download window in which you only have to press Next. In the next step that will appear you will be given two options to choose from. The first is to pre-install the app store, something necessary, and the second is to also include a few messaging apps. In this case, this second option does not matter, so you decide if you want to have them or not.
When the installation is finished, this window will appear in which you will have the Finish button in blue. If you notice, at the bottom left, the option to automatically open the application after finishing the installation is preselected. Leave it enabled, as soon as you click Finish, BlueStacks will open.
Android applications in Windows:
When you run BlueStacks for the first time it will take a few seconds to load the entire environment and update the pre-installed applications, and when finished you will be shown everything as you see it. In the left window, you have BlueStacks as you need it, and the window on the right is a streaming application that you can close without problems.
After closing BlueStacksTV and clicking on the button understood that appeared in the main application you can start. You will see that what you have is an Android desktop with some widget for the promoted apps. Sometimes you can skip a full-screen banner that you will have to close, it is what has to be all free.
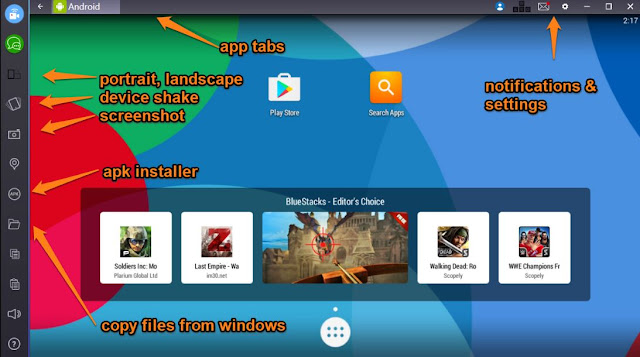
On the left side, outside of the desktop, you will see a series of icons to perform advanced actions ranging from installing apps that you download to copying Windows files. For the conventional use, you will not need it. Therefore, to start, as with any other Android, click directly on the Play Store button to start downloading apps.
As you have not done before, an error screen will appear telling you that you must log in. Click on the Try again button, and you will have to enter the same email and password that you use on your Android mobile. In this way, the data and applications that you have purchased will be added to BlueStacks so that you can use them.
Now you just have to install the Android applications that you want to use on your PC as you would on any mobile or tablet. When you do these applications will be added to your desktop, but you can also search directly in the drawer of apps.
In addition, at the top of the screen, you will have the classic notification bars of Android. You just have to hold the left mouse click on them and slide them down as if you were doing it with your finger. The difference here is that each app you start will open in a separate tab that will appear at the top of the screen. One of them will always be Android, and it will be used to return to the desktop.
When you run an application, it will open in the same size and shape as you would Android. In the left sidebar, you will see an icon in the shape of a straight and be lying mobile. It is the one used to simulate that you rotate the device to put it horizontally, and with it, you can make the apps that allow it to be viewed in horizontal mode to take better advantage of the screen.
And that's it, now you only have to download all the applications you want to use and use them in your Windows. Keep in mind that some may not be compatible, but usually this is one of the alternatives that better compatibilities and performance offers.


